Monday, November 19, 2012

Magical Vegan Cream of Roasted Cauliflower Soup


Yield: 6 servings


After a long (or short if there are kids involved) hike on a cool day, what is more rewarding than serving up a piping hot bowl of creamy soup – yet this cream of roasted cauliflower soup is like Houdini!  It is magical, enigmatic and we’re just referring to the taste, wait till you get to the composition.  This soup will amaze even the biggest skeptic of vegan dishes.  What is so remarkable about this soup is that everyone swears it is made with cream or some sort of dairy product.  Curiously, there is no dairy and that’s where the magic comes in.  The key ingredient is rice, which thickens the soup and gives it body without the calories or fat of dairy products.  Coating the cauliflower in good olive oil, sea salt and cracked pepper before roasting, creates a mesmerizing, caramelized, nutty flavor.  So good, it might not make it to the soup.  Make this soup ahead of time, freeze and hope it does not magically disappear before making it to the campsite.  We warned you, this soup will put a spell of you!

ingredients:
to roast cauliflower:
1 cauliflower head, chopped into small florets
1/3 cup olive oil
1 teaspoon sea salt
1 teaspoon fresh cracked pepper

For soup:
roasted cauliflower
1 cup cooked rice (we like Basmati or Jasmine for a little extra flavor)
3 cups water
¼ teaspoon fresh cracked pepper
sea salt to taste
chives for garnish (optional)

at home preparation:
prep time 15 minutes · total time: 40 minutes
Preheat oven to 425°F (218°C).  In a large bowl, toss cauliflower, olive oil, sea salt and pepper until uniformly coated.  Transfer mixture to baking sheet and cook 30-45 minutes turning occasionally until cauliflower becomes evenly cooked and tips become caramelized brown.

Cook rice according to directions.  Add cooked rice, roasted cauliflower, water, and pepper to a blender.  Blend until silky smooth.  Thin soup with additional water if needed and salt to taste.

Once the mixture is cool, place soup in a freezer bag and freeze until frozen solid.

campsite preparation and presentation:
total time: 10 minutes
Remove soup bag from your cooler and add contents plus 2 tablespoons water to a saucepan. Stir occasionally.  Cook until piping hot. Serve immediately, garnish with chives and pair with warm, buttery bread heated on your fire!

recommended campsite gadgets and gear:
saucepan
heat resistant spoon

cook’s notes:
Make extra soup to be stored in the freezer and serve for dinner at home when life is a little crazy during the week.

Remember Better·Living·Is·Surprisingly·Simple™ in the outdoors.
Magical Vegan Cream of Roasted Cauliflower Soup · Enjoy


Sunday, November 18, 2012

Fireside Sage and Garlic Smoked Pork

Yield: 8 servings

   
Smoked pork amazingness


Kids: What’s for dinner
Mom: Pork butt
Kids: What did you say?!?!?!
Mom: Pork butt
Kids: Mom said butt!!!!! Between giggles and snickers….ehwwww! 

At least this is the conversation that happens with the grasshaven team.  Pork butt always gets lots of snickers and giggles from the kids.   But the parents won’t be giggling when this dish is plated and the first succulent bite is taken.  With aromatics wafting from sage and garlic to the reddish, orange color infused from paprika and turmeric, this dish is an appeal for the senses creating a perceptible change in the outdoor dining experience.

Now that the senses are engaged, let’s address the butt of the jokes.  First, the cut, though called the butt, does not come from the rear end of the pig.  It is actually a cut from the shoulder officially know as the shoulder butt.  Somewhere along the way, pork shoulder butt was reduced to pork butt.  As a cut, slow cooking creates tender, melt in your mouth meat.   Cooking the meat to a higher than normal internal temperature for pork yields meat so amazing it will not be the butt of anyone’s jokes moving forward.  Pair roasted sweet potatoes with brown butter sauce and broccoli florets and even the biggest skeptic of pork butt will be transformed.

ingredients:
Rub
2 tablespoons paprika
2 teaspoons turmeric
1 tablespoon sea salt
1 teaspoon turbinate sugar
1 teaspoon fresh cracked pepper
1 teaspoon ground mustard

Stick
¼ cup old fashioned yellow mustard
¼ cup oil
¼ cup fresh chopped sage
1 tablespoon vinegar
4 big cloves garlic, minced

3-4 pounds pork butt
Rub and stick dressed for the fire

at home preparation:
prep time 10 minutes · total time: 10 minutes
Mix spices for “rub” together.  Mix “stick” ingredients together.  Rub the pork with the stick (named because it helps the rub stick to the pork).  Once thoroughly covered, coat the pork with the rub until the pork is again thoroughly covered.  Place the coated pork, into a resealable bag and place in the refrigerator until departure time.


campsite preparation and presentation:
total time: 3-4 hours
Start a low smoky, aromatic fire.  Place the pork in an aluminum pan (or on aluminum foil).  Add 1-2 cups of water to the pan and tent with additional aluminum foil.  Cook until a meat thermometer reads 180-205° Fahrenheit (82-96° Celsius).  Slice or pull apart and enjoy!

recommended campsite gadgets and gear:
aluminum foil
disposable aluminum pan
meat thermometer

cook’s notes:
Meat thermometers will say pork is done at 140-160° Fahrenheit (60-71° Celsius) however, for tenderness, this cut of meat needs to be cooked longer and slower.

180-185° F (82-85 ° Celsius) for sliced pork
190-205° F (87-96 ° Celsius) for pulled pork

Remember Better·Living·Is·Surprisingly·Simple™ in the outdoors.
Fireside Sage and Garlic Smoked Pork · Enjoy

Take the kids camping!

Here at grasshaven, family time is our primary motivation!  We also have no geographical boundaries so when our friends over  @gocampingaustralia shared five reasons to take your children camping, we knew we had to repost!  Think about it, kids today, all over the world are plugged in...plugged in to computers, watching television, playing video games.  Some estimates put a child's total multimedia hours in the 10 years between the ages of 8 and 18 at over 30,000 hours.  How can the estimate be so large, you might ask....kids are often interacting with multiple devices at one time.  So as parents, how can we reduce this time?  Grasshaven's answer: take the kids camping and experience the outdoors!  Sit around the campfire laughing at made-up stories; find an uncharted trail; reconnect as a family.  While you're at it, build some memories through amazing family time in the great outdoors!


Here are five great reasons to get the kids camping:

1. Family bonding time - we think this is one of the best ways to build family memories
2. Experience nature - a fluttering butterfly, birds singing its nature at its best
3. Learning experiences - what an amazing way to learn new things (for both kids and their parents)
4. Fresh air and open skies - breath it in and relax!
5. Exercise everyone wants to do - the gym or a walk through the great outdoors?  It's not a hard question in our minds to answer

So go ahead and get the kids outdoors!


Remember Better·Living·Is·Surprisingly·Simple™ in the outdoors.
Getting the kids camping · Enjoy


http://gocampingaustralia.blogspot.com.au/2012/11/5-reasons-to-take-your-children-camping.html

Apricot and Honey Smoke Salmon Spinach and Kale Superfood Salad with Citrus Poppy Seed Vinaigrette


Yield: 6 servings

 Sweet + Savory + Smokey + Superfood = Salivation!!!!
This is the equation for an amazing camp dining experience!  Food this good, cannot be good for you- yet it is!  Ok, so lets first talk about the boring, nutrition part… salmon with is Omega 3s; Spinach and Kale high in iron and foliate (and too many vitamins to count); blueberries with their Vitamin C and antioxidants – this is nutrition at its salivation.  What an amazing way to top off a day in the outdoors!  Especially when it is packaged with the gooey, smoky goodness of fire grilled salmon layered on a crisp, fresh bed of greens.  It will send outdoor hungry taste buds into overdrive! 


ingredients:

salmon:
2 pounds fresh, salmon
2 tablespoons honey
½ cup apricot jam
1/3 cup olive oil
2 tablespoons vinegar
2 teaspoons salt
1 teaspoon pepper
1/3 cup scallions (green onions), diced

vinaigrette
¼ cup freshly squeezed orange juice (1 medium sized orange)
1/3 cup olive oil
½ teaspoon sea salt
¼ teaspoon fresh cracked pepper
½ teaspoon poppy seeds

superfood salad
fresh washed spinach
fresh, shredded kale, stems removed
1/3 cup scallions (green onions), diced
¼ cup dried blueberries
½ cup candied pecans
1/3 cup feta cheese

at home preparation:
prep time 15 minutes · total time: 15 minutes
salmon: Combine honey, jam, olive oil, vinegar, salt, pepper and scallions in a resealable bag.  Place marinating salmon in refrigerator the night before you leave.

vinaigrette:
Combine orange juice, olive oil, salt, pepper, and poppy seeds.  Emulsify (stir vigorously).  Pour into and seal in a small resealable bag.

supersalad:
Set out 3 resealable bags (1 gallon size-large; 2 pint size-small). Place washed and dried greens and diced scallions into large resealable bag.   Place dried blueberries and candied nuts in one small resealable bag and seal.  Place feta into second small resealable bag and seal. In the large bag with the greens and scallions, add the sealed fruit/nut bag, the sealed cheese bag and the sealed vinaigrette bag.  Place in the refrigerator until departure time

Salad components
Ready for the cooler 


campsite preparation and presentation:
total time: 10 minutes

Place the salmon on a hot, smoky fire (we use aluminum foil between the fish and fire grates).  Cook until the fish becomes opaque, flakey and cooked through.

Open and pour the fruit/nut, cheese and vinaigrette bags into the large greens bag.  Seal and shake (this tosses and mixes the salad ingredients all together).

Plate the salad and overlay with a slice of warm smoky fish

recommended campsite gadgets and gear:
aluminum foil
heat resistant spatula

cook’s notes:
Salmon should be cooked the first night of a camp trip and left overs (if kept super cold in the cooler) make awesome salmon omelets the next morning (just reserve a little spinach and feta!)

Remember Better·Living·Is·Surprisingly·Simple™ in the outdoors.
Smoked salmon and citrus supersalad · Enjoy


Saturday, November 17, 2012

Food keeping: cooler storage

After a day of exploration, laughs and family bonding (or that is what we call it), everyone is tired and hungry. Now how do you keep everyone fed but safe?

Meal planning before heading on your next outdoor excursion helps make every adventure easier and more seamless.  Many times left-overs and foods brought for one meal become components for another meal. Mr and Mrs Weaver at the Prepared Pantry offer some working guidelines for how long different foods should be keep in a cooler.   

Fresh fish, poultry and ground meat: 1-2 days max
Steaks and chops: 3-4 days
Cured meats: up to 1 week
Eggs: 1-2 weeks
Butter and margarine: butter: 1 week; margarine: 2 weeks
Milk: 2-3 days
Yogurt, sour cream, cream cheese: up to 1 week
Cheese: at least a week
Fruit:  berries and cherries: 1-2 days; soft fruits like grapes, melons, pears, peaches, plums etc: 2-4 days; apples and citrus: up to a month
Fresh vegetables: broccoli, peas, summer squash and lettuce: 2-3 days; carrots, cabbage, cucumbers, green peppers etc: 1 week; potatoes, winter squash and dry onions: couple of months

Happy meal planning!

remember Better·Living·Is·Surprisingly·Simple™ in the outdoors.
Cooler food keeping · Enjoy

http://www.preparedpantry.com/How-Long-Will-Food-Keep-in-a-Cooler.htm.  

Wednesday, November 14, 2012

Camp-side Vegetarian Tacos


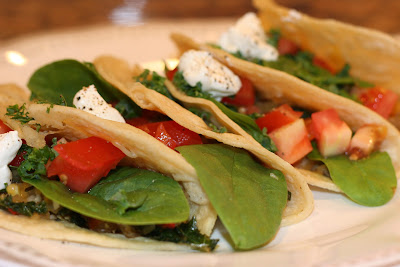
When the grasshaven team ventures into the outdoors, you can bet that the menu always holds a unique flair.  Today, the menu is influenced by areas south of the boarder.  Reminiscent of traditional Mexican street fair, vegetarian tacos are a fun addition to the camping menu and left-overs flavor soups the following day for lunch or spice up rice for a zesty side dish at dinner.  Vegetarian tacos are easy to assemble at the campsite and make a fast, easy dinner after a fun day with the family in the outdoors.  We substitute fresh spinach instead of the traditional lettuce for a little vitamin punch.  At home prep of the filling and taco dressings makes assembly at the campsite a cinch.  Pare with rice and beans for a hearty meal.
Yield: 16 tacos
ingredients:

2 tablespoons oil
1 small onion, diced
3 stalks celery, diced
2 large carrots, diced
1 yellow squash, diced
1 zucchini, diced
1 red bell pepper, diced
1 orange bell pepper, diced
1 can (28 ounces) diced stewed tomatoes, or equivalent fresh
1 can (4 ounces) diced green chilies, or equivalent frozen
2 cups chopped mushrooms (recommend porcini or portobello)
1 cup shredded kale
2 cloves garlic, finely chopped
1 ½ teaspoons sea salt
¼ teaspoon ground pepper
1 tablespoon chili powder (less for milder, more for spicier)
1 ½ teaspoons cumin
additional salt and pepper to taste
2 teaspoons oregano
juice of 1 lime

dressing the tacos at the campsite:
16 (4 ½ inch) soft corn tortillas
3 cups shredded fresh spinach (or lettuce)
1 cup diced onion
4 ripe plum tomatoes, diced
8 ounces sour cream
8 ounces grated cheese
1 bunch fresh shredded cilantro
canned or fresh salsa (optional)
3 radishes sliced thin (optional)
guacamole (optional)


recommended campsite gadgets and gear:
sauce pan
griddle or large skillet
can opener
heat resistant spoon

at home preparation:
prep time 15 minutes · total time: 45 minutes
Heat oil in a large skillet over low heat.  Sauté onions, celery and carrots about 5 minutes.  Add squash, zucchini, bell peppers and sauté 10 minutes more.  Add remaining ingredients and cook until tender.  Let mixture cool as the flavor will increase.  Once the mixture is cool, place filling in a freezer bag for at least 24 hours or until frozen.

The day before your departure, dice tomatoes and onions, shred spinach, portion cheese and sour cream, and set aside tortillas (add a few extra if you plan on making tortilla soup with the left overs).  Place each in its own resealable bag. 

campsite preparation and presentation:
total time: 10 minutes
Warm filling in sauce pan.  Add a 2-3 tablespoons water if necessary. Set aside once hot.  Heat oil on griddle or in skillet  Warm tortillas in hot oil.  Fill each tortilla with veggie filling.  Top with spinach, cheese, sour cream, onions, tomatoes, cilantro, radishes, salsa and guacamole (or any combination of the above that you like).  Serve immediately.

remember Better·Living·Is·Surprisingly·Simple™ in the outdoors.

campside veggie tacos · enjoy

cook’s notes:
If the filling is sweeter than you’d like, omit or reduce the carrot.